
MAKING HIGH PERFORMANCE LOW POLY GAMES
In previous tutorial I talked about scripting optimization in Unity3d. In this post, I will talk about the graphical optimization and how to get the best performance out of Unity.
This post is not meant to be an exhaustive reference on Performance in Unity, but rather a simple guide to how I do things. I will brush over some topics at a high level, and leave you to do your own research on the details of why certain things are good and others are bad.
The Theory:
So, when dealing with unity and performance it all really boils down to how busy you are making your video card. Lots of things factor into what makes a game slow such as: High triangle count, Overdraw, Heavy /Large Textures, How many lights you are pushing in the scene as well as Collider information. On their own, each of these things may not cause a significant decrease in your game’s speed, but if not addressed, these things can cripple your gameplay and make your users who don’t own a cutting edge video card very upset.
As an indie game designer it’s your responsibility to find a balance between what looks great and what performs great. Often times, inexperience or poor planning will set you down a path of making games that will not perform well. In order to combat these things, we will spend some time discussing some points, which I believe to be very important.
First let’s talk about a few metrics. In Unity, there are a few key metrics you should be paying attention to when developing your game.
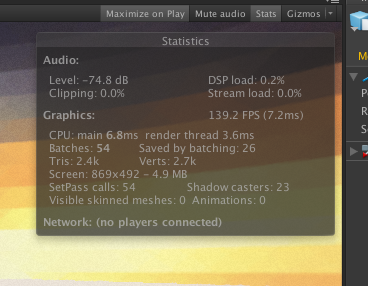
If you are not already familiar with it, you need to start using your Stats window in Unity. This is your first line of defense when it comes down to diagnosing performance issues in your game. If you open the Game view in your Unity editor you will notice a little button in the top right hand corner labeled “Stats”. This little tool will give you lots of great information about your game’s performance and what Unity is doing under the hood. Go ahead, click on it, I will wait…
Frame Rate:
First and Foremost is the Frame rate. This tells you how many times per second your computer is able to completely process a render of your scene. The higher the frame rate, the more smooth your environment will look and feel. Whereas slower and even worse sporadic frame rates will make your game feel jerky and unnatural. But Frame Rate is not in and of itself a very helpful metric, it’s the culmination of other important metrics, but in and of itself does not tell you any information about what is going on.
Draw Calls:
The next important Metric is Draw Calls (Set Pass Calls in Unity 5). This metric tells you how many times per second that your video card is having to draw a piece of geometry. Draw calls are a very special and magical number, as they can often be the main indicator that something is going on with your scene. As you move your camera around the scene, you will notice that your Draw Calls will go up and down. You want this number to always be as low as possible. There are many things you can do to reduce the overall draw call count and we will go over them later in this post.
Triangles:
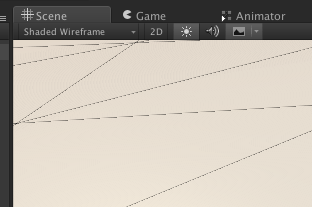
Now, We can get a bit granular and discuss Triangles and Verts. You may or may not know this, but by default (Because of OpenGL) Unity will convert all of your models to triangles. So even if you use a Quad or nGon based approach to modeling in your modeling tool, Unity will for the most part throw that information right out and force your geometry into a triangulated mode. (There are some exceptions to this, but for the most part we will assume you are not in that camp.) So for every square plane that needs to be rendered, Unity will actually render 2 triangles. You can get a sense of how Unity does this by changing your “Shading Mode” options in the Editor/Scene window to either “Wireframe” or “Shaded Wireframe”. Once you change your shading mode, you will now see what Unity is actually rendering.
What’s important to note here is that the more complex your 3D models are, the more triangles they are going to contain. And the more triangles you have, the more time it will take to render them. As a game developer, it’s your responsibility to ensure that your models have only the required number of triangles to please your users. While you may not be a modeler directly, it’s something you need to consider when looking at assets you intend to buy, as it’s easy to find something that looks fantastic but be sorely disappointed once you find out that it’s over a million triangles and just will not work on your game.
If you are a modeler as well as a game designer, it’s incumbent upon you to make sure that the models you produce are not overburdened with unnecessary geometry. Spend some time and remove un-needed edges from your models. The extra bit of time you spend here will ultimately save you a lot of heartache in the end.
One note of interest is the way that Unity reports it’s triangle count. When you view the count in the stats window, it is not just calculating triangles from your geometry, but from your skybox and your lights and shadows too. If you see a triangle count that seems extremely high, try to disable your skybox and lights. This should give you a much more accurate count of the geometry itself.
Batches:
I know, you don’t’ need no stinking batches, but in reality, you do. Batching is a very important operation that happens in Unity whereby, it can dramatically speed up your scene if you enable it and use it properly. Batching means that Unity will use shared data only once and draw multiple objects at the same time with the same texture data.
Think about this scenario:
Suppose you had three objects in your scene, each of them identical to one and other, other than their position in the world space. Now, For each frame, Unity will have to load up the Geometry, UV data, Texture maps, and collider information for each of those 3 items. Which means loading data into the RAM on your GPU. Well as fate would have it’ this is actually a very expensive operation. It’s one of the slower operations of your GPU. So what if you could take advantage of the fact that you have already loaded the data you need into the GPU RAM, and draw all of the things that need those pieces of data all at once. Well, that is what Batching is all about. Anything that shares a Material and UV layout can be batched together into a single Draw Call. So, in our example of the 3 identical objects, it only costs us a single pass to render all 3 of these objects. Some people like to use the analogy of painting. It takes a lot of time to change paint colors, because you have to clean out your brush and then dip into a new color, whereas, if you already have read on your brush, you can paint as many red things that you like without having to worry about changing your brush.
In Unity, batching falls into a few distinct categories, Static and Dynamic. Static batches are by far the most common and should be where you spend the most of your time configuring your scene. An object, which is marked as Static, tells Unity that it will not be moving, and thus the drawing information can be rendered once, cached and reused as needed. Dynamic batching on the other is a bit more expensive to use, but will accomplish the same optimizations for objects that move such as characters and falling rocks.
Other things that influence performance
Now I want to discuss a few other things in Unity, which can have a direct effect on your game’s performance. These are not directly quantifiable metrics, but are potential pitfalls you need to watch out for.
Lights:
It’s easy to go overboard with lighting in Unity. A beginner may often make the mistake of adding hundreds of lights to their scene to create an exotic lighting system for their level. When in reality, this is one of the biggest detriments to your scenes performance. You need to remember that for each light you have in your scene, Unity will have to calculate both the lighting and shadow influence of that light on every piece of geometry in your scene. So for every light you put in your scene, you add another set of draw calls.
Complex colliders
You don’t always need to use a mesh collider for everything. While mesh colliders are very cool, and often times the default collider which Unity will place on a newly imported model, they do come at a steep cost. PhysiX is calculated in the CPU not the GPU, so all of those fancy CUDA cores you have on your NVidia card are useless for calculating physical collisions. The best advice I can give you here is to use Cube Colliders when you can. Yes it will take some extra time to get the proportions right, but at the end of the day, you will make a dramatic impact on your overall level performance by thinking ahead a little bit, and minimizing the collision data happening in your level.
That Static Checkbox
So, let’s assume for a moment that you have never seen that magical checkbox at the top of a GameObject’s inspector window labeled “Static”. This checkbox is one of the most vital things you can do in Unity to affect your overall performance. By ticking this one checkbox, you give Unity permission to do some awesome things in your scene. Let’s go over a few of them.
By enabling the Static Option you are telling Unity that this object is never going to move and Unity will take advantage of that fact and Cache a LOT of data about your object and make it so that it will barely ever have to use the render pipeline again.
While you can technically set Any GameObject to be static, you will only see advantages to doing so with Mesh Renderers and Lights.
Now that Unity knows that these objects will not move, only changes from Non Static objects will effect their rendering. There is also one other thing you need to do to take advantage of Static GameObjects and that is to Enable Static Batching in your Build Options. 
Rendering Pipelines
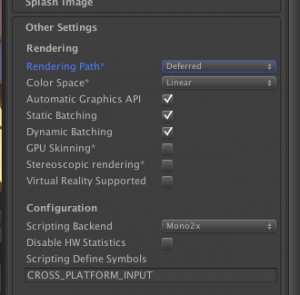
While this post will not get into the specifics of the differences in the rendering pipelines offered in Unity, I will say that when at all possible, use deferred rendering. It’s a much faster system and offers a lot more flexibility when you start getting into effects like post processing tools.
Most video cards support deferred rendering, and there are only a handful of reasons you would ever really need Forward Rendering these days. This can be set in your Player Settings.
Shaders, Materials and Textures
Of all of the things that Unity users struggle with understanding, the relationship between Shaders, Materials and Textures are one of the most difficult to wrap your head around. There is an intrinsic relationship between all 3 of them but they are all very different things.
In a nutshell:
- A shader is a program.
- A material is an instance of a shader program.
- A Texture is a parameter, which feeds into a material instance.
A Shader is a program written in a shader programming language like ShaderLab, GLSL, Cg, etc… These programs are written in such a way that they manipulate the instruction set on your actual GPU. It’s rare that you would actually do much with a shader in and of itself, whereas you will interface a single instance of this Shader program with a Material.
A Material, is a single instance of a shader. Just like when you startup a command line program on your computer with arguments , a Material represents a single running instance of that Shader. All of the parameters in the material adjustable such as Textures, Intensity of effects like reflectivity and other miscellaneous settings
A Texture while being an image to you, is actually a collection of points on an X/Y axis to Unity. When fed into a Material, a single pixel of a texture will be given to a Shader program to tell it information about: Color, Normal Direction, metalness, Roughness, Opacity etc…
- Keep the size of textures as small as possible while still looking nice. If your graphics card does not have enough memory to keep all the textures in memory at once, they will get placed into regular system memory and uploaded to the card during rendering. This can be okay as there is a lot of bandwidth available on newer computers; however, if you go too nuts your game will completely choke on computers with low amounts of graphics memory. There is no need to edit the size of textures in your image editor. You can edit the size that Unity imports the image on in each image’s Settings.
- Don’t use low quality image files. Trying to use jpeg files with low quality or low-color png or gif files will not result in a smaller player size. Unity compresses all textures when publishing the game automatically, so keep the source texture files as original high-resolution files. This will minimize quality degradation due to multiple compression and decompression.
The Standard Shader
Ok, now that you hopefully have a good understanding of the differences of the shading trinity, let’s talk about the Standard Shader provided by Unity and why you need to be using it.
The Standard Shader is an extremely powerful shader provided to you free of charge by Unity. It took them a lot of time and energy to get it right, but it covers a lot of bases and can be used in 99.9% of all cases. What’s special about the Standard shader other than its complete flexibility to work in almost any scenario is that when your game is compiled, the Standard shader trims out the pieces it does not need and automatically improves its own performance. For example, if you don’t put a normal map on your material, that instance of the shader will compile with our normal map passes, and thus reduce your overhead for rendering.
Occlusion Culling
OK, if you have been using Unity up to this point and not ever bothered to look into Occlusion Culling, you need to stop what you are doing right now and make sure you implement this immediately in your scene. Though the name may seem silly, what it means is that it will cull from your scene, things that need to be rendered based on whether or not your camera can actually see them. So suppose you have 1,000 game objects in your scene, without Occlusion Culling, Unity will by default try to render every single one of them if your camera can see them or not. Now imagine if Unity was smart enough to think about things and say, hmm, I can’t even see this item, so there is no use in bothering to render it.
Obviously, Occlusion Culling is a much more complex topic than this, but it is the one thing that will have the most dramatic effect on your game’s performance.
One final note is that Occlusion Culling only works with Static Objects, so yet again, if your objects are not moving, mark them as static.
Audio
Use .ogg for compressed audio. Any other audio format will be stored as uncompressed PCM audio in the published player.
Use uncompressed audio for small sound effects. Unity (as of 1.6) decompresses all ogg files on the fly. It pays to have short sound effects played often stored as uncompressed wav or aiff files in order not to spend CPU cycles on uncompressing the audio. Examples of where this matters are rapid gunshots, footsteps and similar.
Physics
Each rigidbody takes computation, so less are of course ideal. Rigidbodies also have the ability to sleep when their angualr and translational velocity drop below a certain threshold. When this happens the amount of computation they require drops significantly and remain low until they have a force manually applied to them or a collider touches their collider if it exists.
Complicatef collisions take more computation than simple ones. A large pile of rigidbodies with sphere colliders should be more complicated to process than if those spheres were laying far from each other on a terrain.
Baked Lighting
Earlier I talked about how it’s easy to let lighting get out of hand and that Unity bases its rendering off of each light in your scene’s influence on each Game Object. Well as it turns out, there is a way to circumvent this and it’s called Baked Lighting. As the name indicates, Baked Lighting will take all of your scene data and pre calculate all of the lighting information into a single data set, thus eliminating the need to have the lights at runtime at all. With Baked lighting, Unity will create a map/texture of your entire level (based on UV2 layout data) and save it to your local build. At runtime, your shaders will not need to calculate lighting information based on vector paths or try to solve bounces or anything at all, it simply pulls the data from the baked lightmap texture into the shader at runtime.
So, if baked lighting is so awesome, why don’t’ more people use it? Well like many things it comes at a price. Baked lighting has 3 main downsides, all of which are things you should consider.
The downsides are:
- It’s Slow…Baking Lightmaps can literally take hours if not days.
- It’s Big…If you have a large scene, expect your baked lightmaps to be big, this will cause your installation footprint to grow
- It’s Static…Once your lights are baked, you can’t make changes to the lighting on the fly.
- Baked Lighting only works with lights marked as Static, so yet again if your objects are not moving or changing, mark them static.
If you have enjoyed reading this article, please like it, share it and leave your feedback in the comments section below.
This was posted . Additionally, if you would like to see some of his work as a reference, wanna support or buy some of his kits, you can find them here.